Purchase Lead Scanning capability through CompuLead's Registration Platform: https://www.compusystems.com/servlet/ar?evt_uid=466&site=EXH
Installation
- To install CompuLEAD on either your Android or iOS devices, simply navigate to the Google Play or App Store on the
 devices.
 - Search for the lead retrieval app by using the words “CompuLEAD”.
- Then select Install for Apple devices or Download for Android devices.
- Once CompuLEAD has successfully installed on the device, scan the badge or enter the username/ password you received in your confirmation email when you purchased CompuLEAD.
- Once the app has been activated, you will be asked to set up your device profile. This includes labeling your device so you know which leads were scanned by which device, if the app is activated on multiple devices. Labeling your device is required, by default the app will be labeled by device number (i.e. Device 1, Device 2, etc...) but you can label your device however you wish (i.e. Mark’s Phone). After setup, your device profile can be changed by going to Settings (all preexisting leads will be associated with the new device profile).
- Now, we are ready to scan some attendee badges.

Scanning Attendee Badges
- Scanning attendee badges is quick and easy to do.
- All attendee information you gather will be stored in your own online lead management portal, myLeads.
- You can access myLeads through your exhibitor dashboard or via the link in your email order confirmation.
- If you don’t have a Wi-Fi or Internet connection, partial data will be stored until a connection occurs. You can still qualify the leads and add notes.
- To begin, select the +Add New Lead button.
- A QR Code reader interface will appear.
- Line up the camera with the badge, and make sure the QR Code (highlighted above) can be seen.
- Hold it briefly, and CompuLEAD will capture the attendee’s information.

Editing Contact
- The information gathered contains the attendee’s full registration information.
- If the attendee does not fill out certain categories during their registration, those areas will not display when gathering the lead.
- You can edit and add information (highlighted above).
- To navigate the CompuLEAD app, slide the left-hand navigation out by swiping a finger, from left- toright, across your phone. You can also access the navigation by clicking the back arrow in the upper left corner of the screen and then clicking the menu bars in the upper left corner.

ADDING QUALIFIERS TO A LEAD
- Once a lead is collected, you can select Qualifiers or Surveys and add Notes to the record.
- Any Custom Qualifiers or Custom Survey questions you provided when you placed your order can be found here.
- To add Qualifiers to a record, select the option in the bottom menu bar.
- Check all applicable boxes.
- You can either select one of the other buttons at the bottom or click the back arrow in the top left corner. Your selection is automatically saved.
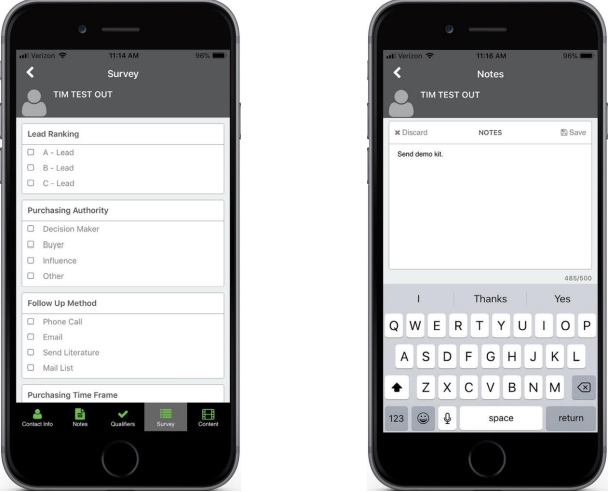
ADDING SURVEYS & NOTES TO A LEAD
- To add Surveys to a record, select the option in the bottom menu bar (highlighted above).
- Check all applicable boxes.
- You can either select one of the other buttons at the bottom or click the back arrow in the top left corner. Your selection is automatically saved.
- To add Notes to a record, select the option in the bottom menu bar (highlighted above).
- Once you have added a note, you can either select one of the other buttons at the bottom or click the back arrow in the top left corner. Your selection is automatically saved.

SENDING LITERATURE
- During the ordering process for CompuLEAD, you can add literature to your Exhibitor Profile.
- With CompuLEAD, you can send an attendee a piece of literature about your company, specific products, or other general information.
- Select the Content button at the bottom of the screen.
- Next, select the piece of literature you previously uploaded to your profile.
- If you have more than one piece of literature, you can select multiple to send.
- Once you have selected your literature, click Send Content. The lead’s email address and attached literature will be prepopulated into the email.
- Select the email address that you would like to send the content from or type in a new email address at the bottom.
- Once the email address has been selected, the lead’s email address and attached literature will be prepopulated into the email.

MANAGE MYLEADS
- You can access an attendee’s information through your exhibitor dashboard or via the link in your email order confirmation. From any screen, slide out the left-hand navigation and select View Leads.
- Leads in blue are gathered while off Internet connection and need to be synced with myLeads.
- Black leads are synced and properly stored in myLeads for viewing on your smartphone or computer.

TEST BADGES
- Once CompuLEAD is activated, you may begin scanning test badges provided on this page.
- On the app, select + Add New Lead and then hold your device over the QR Codes on the sample badges. The QR Codes are highlighted above.
- Instead of just scanning, you also have the option to add attendee’s information by entering their badge number into CompuLEAD.
- On the app, select + Add New Lead, then press Enter Badge at the top of the screen.
- Enter these sample badge numbers to add sample records to your test app.
- Sample Badge Numbers: 1100247 1550573 1553703 1547867 1553086 1557359
Was this article helpful?
That’s Great!
Thank you for your feedback
Sorry! We couldn't be helpful
Thank you for your feedback
Feedback sent
We appreciate your effort and will try to fix the article